
Disclaimer
Check your local copyright laws before undertaking a project like this. I am not responsible for anything that happens as a result of you following these instructions. Proceed at your own risk.
Also, I am not affiliated with any of the projects or companies mentioned here.
How to Backup Your Optical Media Collection 📀
Why You Might Want To
Optical media has some solid pluses. Ease of use in today’s world is not one of them. Anyone who has ever tried to binge watch a season of something on DVD or Blu-ray can tell you, getting up to swap to the next disc is just not the same as the auto-play next experience popularized by Netflix. Also when was the last time you had a laptop with an optical drive? They sure seem to be going the way of the Dodo bird.
Digitizing (I know that optical discs contain already digital media, but this is how my brain sometimes categorizes it anyway 🤪) your media has some pluses (some minuses too). Here are some that jump out to me:
- No more dealing with discs (after you finish the ripping & compressing of course)
- Metadata-rich experience while browsing and watching media
- Faster to get to the content you actually want to watch (no more unskippable previews or sloooow loading menus, I’m looking at you Blu-rays 👀)
- Flexibility
For me, one of the big reasons to go discless was having a toddler, for whom DVD, Blu-ray, & Wii cases were unconquerably alluring. After backing everything up to internal storage, I got rid of the cases, put the discs in a giant CD wallet and boxed it all up out of sight. 5/7 would recommend.
Why You Might Not Want To
There are definitely some reasons you might not want to go discless. Here are some:
- Time. Sooooo much time spent ripping and compressing things!
- Streaming services availability
- Legality in your country
- Hardware availability
- Maintenance effort
- Did I mention time? It is a long project if you have a lot of discs.
How Does Streaming Fit In?
Now I can practically hear someone screaming “Don’t bother! Streaming is the answer!” to which I say, “Streaming sucks!” Here’s why:
- Service fragmentation:
- Different interfaces to learn everywhere and different apps to maintain/update/etc.
- 💰💰💰 or ads (sometimes both):
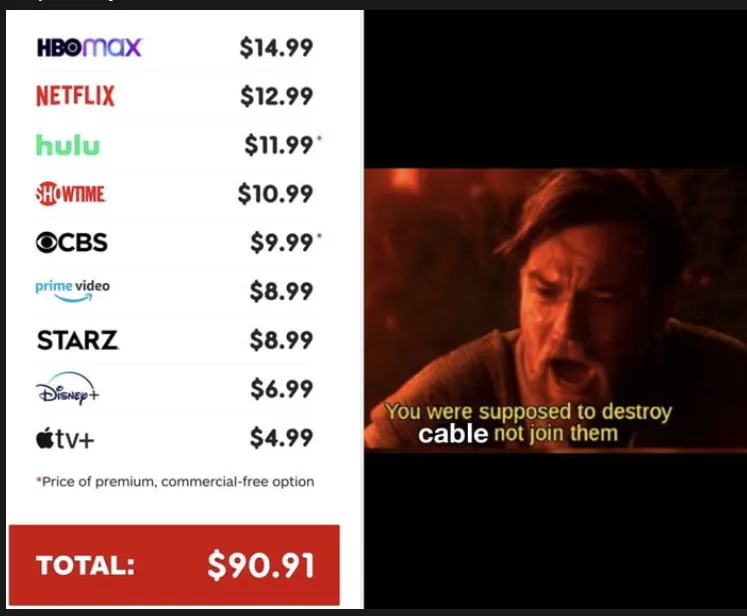
- Sure Disney+ isn’t terribly expensive on its own, but you add it to Prime Video & Netflix & HBOMax & Hulu & AppleTV & & & … and it’s more expensive than cable TV.
Obligatory Episode III meme - Licensing:
- I’d much rather buy a thing once and use it however I want than have to pay for that thing every month―use it or not―and have it potentially disappear from the service without me being able to do anything about it. The physicality of discs wins some major points here. Enough that I would pretty much always rather buy the disc and rip it myself than buy it digital only.
- Decreased choices:
- Sometimes a particular show or movie isn’t available on any streaming platform. Sometimes they come & go. In both cases, my ability to chose is limited―something I generally try to avoid.
Why You Might Care About Instructions From Me
One word:
- Experience.
More words:
- I’ve walked this path (multiple times because of some poor storage choices I made―we’ll probably discuss that more a bit later) and successfully guided others along it too.
Where to Begin?
This task is not for the faint of heart, but the rewards for those who walk this path are great. If you’re undaunted, continue on, dear reader!
Gather the Things
- Some number of discs you care to backup:
- The number will affect many aspects of this process but I’ll generally write assuming a collection of interest somewhere in the 50-100 discs range.
- A computer with a disc drive capable of reading the discs which you want to back up:
- This is becoming less and less common so purchasing one just for the project is a very real possibility. Fortunately they are relatively inexpensive.
- The computer for ripping doesn’t need to be particularly powerful. For compressing, you’ll want the beefiest CPU you can manage to utilize.
- Somewhere to store & serve the resulting files:
- A RaspberryPi with some external storage attached works great for many folks.
- My personal solution is a large and noisy server with many hard drives in it running TrueNAS SCALE. I love it so much! 🥰
- There are myriad other options as well. Pretty much any computer with adequate storage for your collection can get the job done.
- Considerations to inform your computer and storage choices include but are not limited to: size of your collection, if you’ll be accessing it on the go or just at home, number & type of devices you plan on using to watch the media―total & concurrently, number of users you expect to support, your network capacity (internet too if you want to watch on the go).
- The appropriate software1 to make the job manageable and make your discless experience better than your discful one:
- Ripping tool(s): My go-to is MakeMKV
- Compressing/encoding tool(s): For something with a GUI HandBrake is hard to beat―not that it doesn’t have a CLI, just it is a nice GUI tool. FFmpeg is a fantastic CLI tool, but decidedly does not win the least-overwhelming-options-and-interface-enough-so-that-you-don’t-ever-find-yourself-searching-for-how-to-execute-specific-bits-on-StackOverflow award™―at least not in my experience.
- Media management tool(s): There are many to choose from. If you prefer the FOSS route I’d highly recommend both Kodi & Jellyfin. If you don’t mind the Freemium model, Plex & Emby are both compelling options. Here are the ones I have the most experience with, in descending order (i.e., most experience first):
- Kodi
- Plex
- Jellyfin
- Emby
Use the Things
Since I don’t know specifics about which things you have decided to use, the instructions here are going to be focused on the things I’ve used most. I’ll provide at least general guidance on other things where I can though.
I’m going to assume that anyone following this guide has a certain minimum level of comfort with technology in general. The level I’m assuming presupposes that travelers here feel comfortable installing software on the computers they use regularly. If that is not the case for you, it seems to me that more specialized help would be in order―more specific instructions written to match the things you’ve chosen. If you are interested in something like that, leave a comment saying so and I’ll see what I can do. Make sure to include which things you are using/want to use.
Install the Things
So you’ve gathered the things you’ve chosen to use (you have gathered them, right? If not you might want to go back and do so before proceeding). Go ahead and install the software tools you’ve chosen on your ripping box, your encoding box, your serving box, & your watching box (these could all be the same box, that’s how theBoyd likes to roll. For me ripping & encoding often happen on the same box, with a separate serving box and several watching/client boxes). For this guide we’ll use MakeMKV for ripping and HandBrake for encoding. I’ll likely talk about Kodi, Plex, & Jellyfin for media management & consumption.
Rip Some Discs
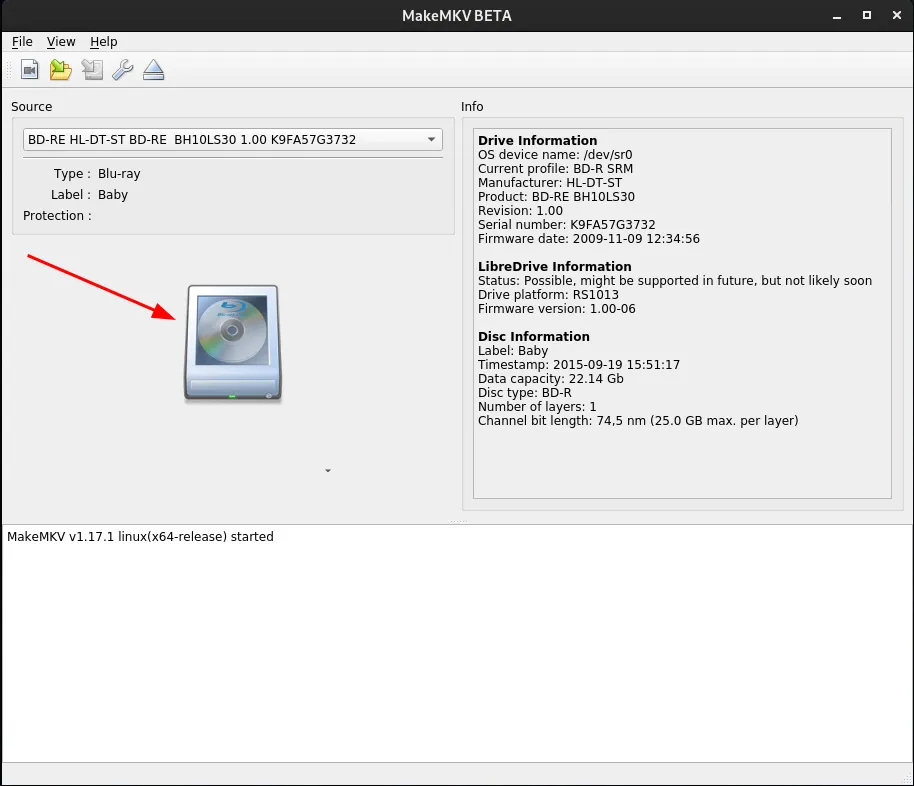
With your ripping and encoding box(es) ready to go, grab a disc, put it in the disc drive of your ripping box and open up MakeMKV.
Disc One 📀
MakeMKV will do some automatic startup things that take a little while (couple of minutes or less)―basic “is this a disc I can read?” type things. After that you’ll see a screen something like this (subject to differences in MakeMKV versions, OS, screen size, optical drive hardware, etc.):
If you click on the icon indicated with the arrow on the screenshot above, MakeMKV will analyze the titles on the disc that you can convert to .mkv files. After that completes you’ll see something like the title selection screen depicted here:
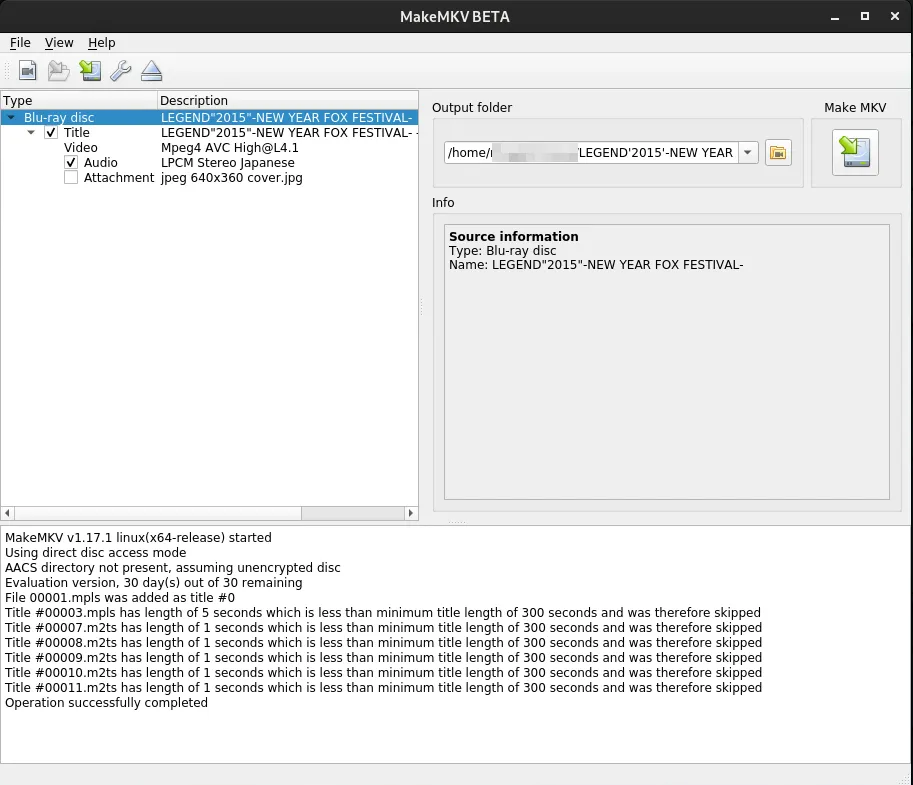
Depending on the disc you may see one or many titles. Usually the largest title is the feature of the disc. Fortunately the ripping is fast so you can leave them all selected and check the files post-rip to see what they are. It might take some trial and error to get used to the layout of discs and which titles you are interested in―fortunately it is a very surmountable obstacle.
If you click on the arrow icon next to a title it will expand so you can select which audio tracks, subtitles, and extra files you want to include. Picking which audio tracks you care about here can save you some ripping time, but ripping is fast enough that I wouldn’t worry about it too much. I do recommend picking which subtitle tracks you want as this is the most reliable way to include them. Anything with a filled checkbox will be included in the output .mkv files.
After you’ve got the proper titles/tracks selected, check and adjust the output directory so you’ll know where to find your shiny new .mkv file(s) once the ripping is complete.
Now you’re ready to hit the MakeMKV button (icon with a diagonal green arrow in the upper right of the window) to start the ripping process! Depending on the output directory you picked you might be presented with a dialog box asking if you’d like to create the directory. Usually for me the answer to that question is “Yes” because I’d rather go futz with folders & files in my file browser than in the MakeMKV interface. The time to complete the ripping process will vary based on your hardware, size of selected tracks, etc. but in my experience DVDs take about 20 minutes and Blu-ray discs about 40 minutes.
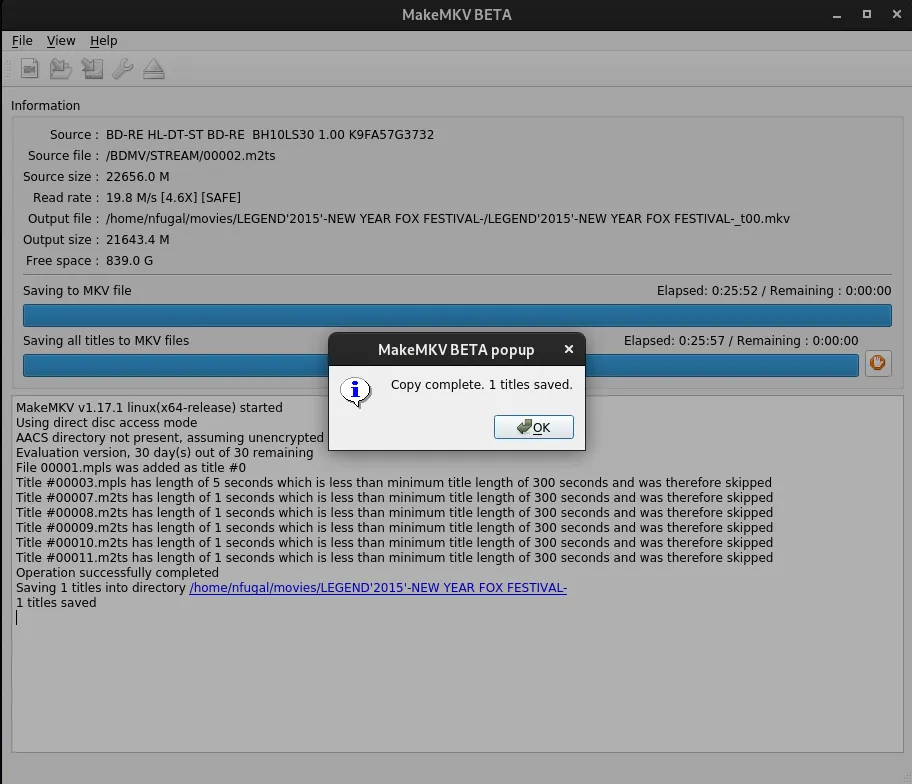
Wait for the ripping to finish (you can tell it is done because MakeMKV tells you it is with a handy dialog box, pictured above ⏫) then go take a look at your output directory to see your shiny new .mkv files. If you couldn’t tell which title was what earlier this is when I recommend opening them to get that figured out (checkout VLC if you need solid media player software):
❯ lsd -F -R --group-dirs first
🗁 LEGEND'2015'-NEW YEAR FOX FESTIVAL-/

./LEGEND'2015'-NEW YEAR FOX FESTIVAL-:
🎞 LEGEND'2015'-NEW YEAR FOX FESTIVAL-_t00.mkv
Lather, rinse, repeat for each disc you want to rip.
Naming/Organizing Your Media 🗃
This is a good time to make sure the files are named something helpful. By MakeMKV’s default they will be in the shape of:
DISCTITLE/DISCTITLE_t##.mkv
e.g. from the disc used in the screenshots above you get this output:
LEGEND'2015'-NEW YEAR FOX FESTIVAL-/LEGEND'2015'-NEW YEAR FOX FESTIVAL-_t00.mkv
My personal preference for naming, which tends to mostly play well with media management software, is this shape:
<Top Level Movies Directory>/<Title, The> (<year>)/<TitleClean>_<quality>.<ext>
The 2008 film the Brothers Bloom, for example, would look like this:
Movies/Brothers Bloom, The (2008)/Brothers Bloom_1080p.mkv
For the 2003 film Daredevil, it would look like this:
Movies/Daredevil (2003)/Daredevil_1080p.mkv
For TV I follow the same general pattern, modified a bit to account for seasons & episodes. Here’s the general shape:
<Top Level TV Directory>/<ShowTitle, The> (<year>)/Season <#>/S<##>E<##> <EpisodeTitle>_<quality>.<ext>
So the delightful, cult-classic from 2002, Firefly, would look like this:
TV/Firefly (2002)/Season 1/S01E01 Serenity_2160p.mkv
TV/Firefly (2002)/Season 1/S01E02 The Train Job_2160p.mkv
[. . .]
TV/Firefly (2002)/Season 1/S01E14 Objects in Space_2160p.mkv
TV/Firefly (2002)/Season 1/S01E15 Serenity_2160p.mkv
No, that’s not a typo. There is the episode titled Serenity and the 2005 film of the same title. The film is the grand finale of the series.2
The organization I’m talking about here is what I suggest for production/library files. I like to utilize a staging directory, with similar structure, for the files that are still in progress, not yet encoded, not yet properly named, etc.
With your raw .mkv files named helpfully, so you’ll be able to identify and sort them into your library structure, now you’re ready for encoding!
Encode Some Files 🎞
If you have lots of storage compared to your collection size, or you are very particular about quality you might want to skip the encoding process. I do not have lots of storage compared to my collection size so compression/encoding was very much in order for me.
Breaking… with Hands 👐
HandBrake is a fantastic piece of software capable of waaaay more than I’ve ever used it for. We are only going to scratch the surface here.
Launch HandBrake and you’ll see a screen something like this:
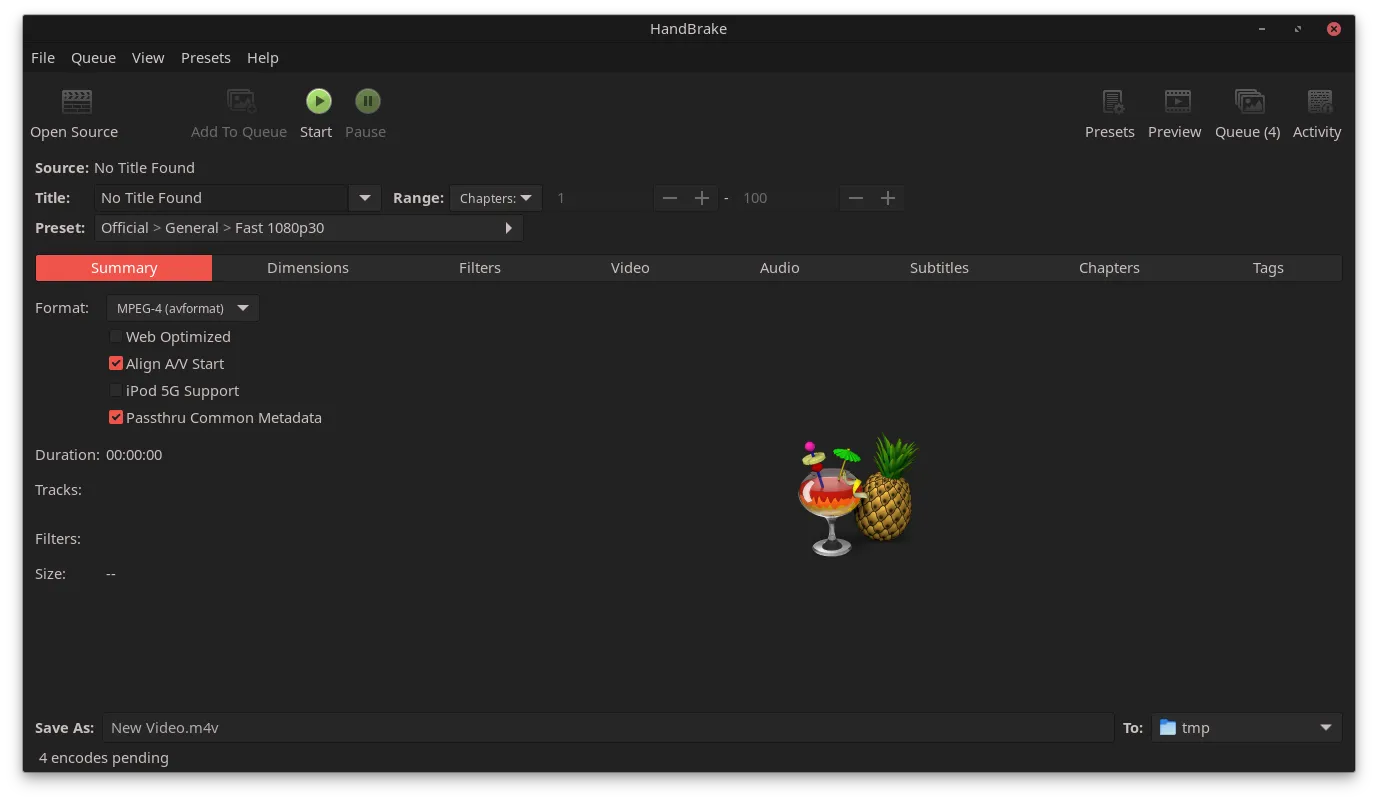
To encode a video file follow these steps:
- Click on the
Open Sourcebutton in the upper left of the window. Source here means “file you intend to encode” - Locate the file of interest in the file picker, select it, and click on the
Openbutton. Depending on the size of the file picked you may have to wait a bit for HandBrake to acquaint itself with the file. - Pick a preset3 that fits your use case, or select all custom settings. You might not be surprised to find that I prefer to use MKV as the container for my video files. My library has a mix of H.264 & H.265 encoded files because H.265 was not widely supported last time I re-ripped & encoded my library and I haven’t taken the time to go back and redo the H.264 content yet. For audio I generally use the passthru option and let the client device figure out how to deal with it, rather than force something in the file itself. Similar for subtitles―no burn-in/hard-encoding for me, I use subtitle tracks and client devices smart enough to let me choose a subtitle track.
- Once you’re pleased with your options (check the all the tabs) you can either queue the encode or start it immediately. My M.O. is to queue enough to keep the machine busy, say through the night4, and then kick it off.
Serve Your Media
I lump the prep, ripping, and encoding into the interesting-at-first-but-quickly-tedious category. By contrast, this section is where you get to start enjoying the fruits of your labors.
Kodi
![]()
Kodi has been around since the days when the original xBox was Microsoft’s current generation console. In that time it has evolved much but what I think of as Kodi’s core strength has not changed―play any of your media flawlessly and look good while doing it. Kodi is very customizable but the many ways you can customize it are out of the scope of this guide5.
Strengths & Weaknesses of Kodi
Strengths, including but not limited to:
- Playing any media format I’ve ever thrown at it in over a decade of heavy Kodi-use
- Excellent metadata-rich experience
- Customizable out the wazoo: can’t find a skin you like? Create your own! Don’t like that button over there? Remove it! Same goes for colors, backgrounds, sounds, and so on!
- Client-only model let’s clients handle playback thus avoiding the need for any complicated transcoding setup
- Open source
- Free, as in beer
- Robust & enthusiastic community
- Cross-platform availability
Weaknesses, also including but not necessarily limited to:
- Not quite as intuitive as some media consumption options, anecdotally
- Remote-access setup
- Has gotten some undeserved blame for piracy―Kodi does not include any media, nor does it produce hardware. Anyone selling so-called “fully-loaded-Kodi-boxes” is not affiliated with Kodi
Assuming you have Kodi installed on a client box (you did that under the Gather The Things section, right? Right?!?), fire it up, point it at your ✨ immaculately organized media ✨ and enjoy! If you need more detailed instructions checkout their first time user guides.
Plex
![]()
I don’t have as much experience with Plex as with Kodi, but it is a solid option for sure. Some of my favorite people use it (Hi JD! 👋) and I think that had I been introduced to Plex before I was so comfortable with Kodi, I may very well be a dedicated Plex user today. As it is, I am not.
Strengths & Weaknesses of Plex
Strengths:
- Anecdotally, seems to be the most beginner-friendly option, as far as user interfaces go.
- Excellent metadata-rich experience
- Slick & accurate matching of media to proper metadata
- Central authorization allows media sharing with friends
- Cross-platform availability
- Server-client model means client devices don’t have any heavy lifting to do
- Easy setup of remote access to enjoy your media anywhere
Weaknesses:
- Closed source
- Freemium6 distribution model
- Interface customization is a bit lacking
- Server-client model means server hardware matters more
- Subtitles seem to bring even moderately powerful hardware to its knees
Those of you hoping for Plex install/setup instructions should check out their Official Quick-Start Guide and/or this guide from HowToGeek.
Jellyfin
![]()
If you like the client-server model of Plex but are itching for something open source, have I got a solution for you! Enter Jellyfin:
Strengths & Weaknesses of Jellyfin
Strengths:
- Open source
- Free, as in beer
- Excellent metadata-rich experience
- Solid community forums/support
- Cross-platform availability
- Server-client model means client devices don’t have any heavy lifting to do
Weaknesses:
- Complicated setup
- Interface customization is a bit lacking
- Server-client model means server hardware matters more
Anyone hoping for guidance on getting up and going with Jellyfin should checkout the Jellyfin Docs.
Conclusion
If you’re still reading this, color me impressed with your stamina. This article has been both longer and shorter than I expected, but I think it falls squarely into the long territory. If you have specific questions or liked my instructions enough to hope that I’ll write more, let me know in a comment and I’ll see what I can do.
Hopefully now you are well on your way to leading a discless life. If you have already achieved media-Nirvana I congratulate you. Take care, fellow traveler.
Remember, if something hasn’t gone wrong yet, you’re not trying hard enough.
-Nate
-
All of the software tools listed are available on many OSes. Specifically for me, Linux availability was paramount (👈 movie studio pun! 🥁), but I’ve helped others walk this path with Windows & MacOS too. ↩
-
One should always watch Firefly in the correct order no matter what Fox thinks. ↩
-
HandBrake comes with many excellent builtin presets covering a wide variety of devices, qualities, codecs, etc. If you find yourself wanting different options regularly you can define your own presets to decrease the clicking required to get an encode going. A note about the builtin presets:
H.265 MKV 2160p60for example does not upscale sources to that resolution/frame-rate combo. It is a maximum. So a1080p30source encoded with theH.265 MKV 2160p60preset will have a resulting file with1080p30resolution/frame-rate combo. If you do define a custom preset, I suggest double checking the various settings at least the first few times you use it to make sure you didn’t miss something―I’ve wasted many computer cycles and much time that a simple double check could have prevented. Learn from my mistakes. Do better. 😄 ↩ -
How long an encode job will take depends on the hardware used for encoding, length of title, and codecs in use (probably some other things too, but those are the big ones). On my encode box, DVD sources can encode in H.265 with passthru audio much faster than real-time playing of the title. Blu-ray sources are roughly double real-time with those settings. ↩
-
One customization I can’t help but mention is: migrating your Kodi database to a centralized MariaDB/MySQL server. This is practically a must for multi-client setups. It centralizes your watched/unwatched status and progress across devices and is well worth the effort IMHO. The instructions on the Kodi wiki are solid. ↩
-
Giving credit where it is due, the free features of Plex are quite generous―miles better than many other freemium apps/services ↩
Leave a Comment
Your email address will not be published. Required fields are marked *